How to Build an Ethernet Cable from Scratch
When setting up a networking system for office or home you need an appropriate length of cable. If the architecture is older, or repurposed, your building may not have been designed with networking in mind. You might need cables that are shorter or longer than standard sizes. If you go to your local electronics or computer store, they will carry 6, 25 and 50 foot pre-packaged cables. However, if you need differing lengths, buying tools in bulk and building your own will save you money, even considering that you may waste a bit of material as you learn through trial and error.
There are surplus websites that sell cabling materials for cheap. Sometimes, checking more general sites like Amazon.com and Ebay.com can lead you to deals on the equipment you need.. You will need a spool of the necessary cable depending on what you need for your network. Most will require a version of ethernet cabling, generally known as RJ-45 or CAT 5. If your hardware is a bit newer, you will need ‘straight-through’ cabling. If you are building your network from the ground up, it is advisable to seek the most modern systems. They will last longer, as will the period of time professionals can repair them. If you are stuck with older technology, you might find that you need to use ‘cross-over’ cable to connect multiple hubs or devise-switches.
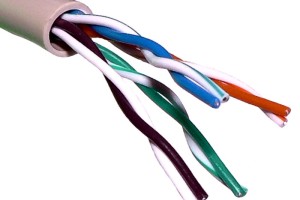
Once you have determined the needed cable, purchase a spool with PVC or plenum jackets. PVC is cheaper and plenum is safer, though PVC is a little more workable, as a material at large. You will also need to buy plugs- those square-ish plastic things you find at the ends of network cables- and a pair of wire cutters. Two more specialized tools that you may need to find or buy are a wire stripper and a pair of crimpers. Once you have assembled your tools, you can begin. Measure your spooled cable to the length you need and strip the jacket off at both ends to about an inch. Untwist the internal wires. For straight cabling, organize the wires by color as such from right to left- brown, whitebrown, green, bluewhite, blue, greenwhite, orange, and orangewhite. If your needs imply cross-over cabling the two ends will be different. From right to left on the first end- brown, brownwhite, orange, bluewhite, blue, orangewhite, green, greenwhite. At the opposite end, the wires are, from right to left – brown, brownwhite, green, bluewhite, blue, greenwhite, orange, orangewhite.
Unfurl the wires and pinch them close together to trim them evenly down to a fourth of an inch. Slide them into the plug with the clip side facing down. Look for a tight fit without smashing. Be sure that the wires touch the golden leads inside the plug. Use your crimper to crimp down the plug. To make sure your cable is effective, plug it into your network and test it. If it works, Eureka! You have yourself a custom ethernet cable.