 Going in depth as to how the wire itself is made is a long process. For the sake of this article it will be discussed how to make Cat5 wire into an ethernet cable. The first step in the process is to unroll all of the network cable. It is a smart idea to leave a little extra incase any of the wires have rips, cuts, or tears in their plastic sheathing.
The outer jacket of the wire needs to be carefully removed so as to not cut the jacket covering the internal wires. It should be noted that if one of the inner wires has damage to the casing they will need to be cut off and the process starts again. Now you’re glad you have that extra wire aren’t you?
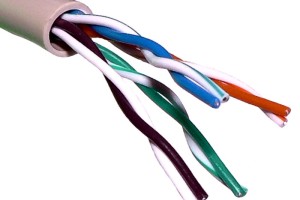
The easiest way to cut off the outer jacket is to slice it lengthwise about an inch from the end. Then cut around the outer casing. It is easier to move the wires out of the way at this point. Once the outer jacket is away, there will be four pairs of twisted wires (eight wires total). Each pair will be color coded with one solid and one white with a stripe that matches its paired wire.
No matter how careful you were, check the inner wires for cuts and scrapes. None of the copper wire inside should be exposed. If it is, there will be poor connectivity when the project is done. Untwist the wires so that they are flayed out and trim them to 3/4″ in length from the outer jacket.
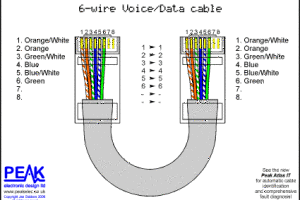
The wires will need to be laid out to match the job specifications. This will most commonly be (from left to right) white orange, orange, white green, blue, white blue, green, white brown, brown or, alternatively, white green, green, white orange, blue, white blue, orange, white brown, and brown.
Place all of the wires directly next to each other, so there is no space between them. Make sure the wires have stayed in the same position. Cut the wires down to 1/2″ from the jacket. It is important to make sure the wire are cut flush or connectivity will be damaged.
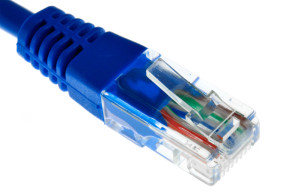
With the wires still flat and in the same order, slide them into the RJ-45 (ethernet) plug. The flat surface of the plug should be on top. Look at the plug to make sure all the wires went into the plug. Some muscle may be needed to get them all into the right space.
Before crimping the wire, once again, make sure the wires are in the right order. The crimping tool will make a ratcheting noise when the process is complete. Some people prefer to double crimp to make sure all of the pins stay in place.
This process will be repeated for the other end of the cable. When both ends are done and plugged in, be sure to check the connectivity. This can prevent issue further down the road. As uou can see, the process is fairly simple, and with practice it will become as natural as breathing.